0
0
WoW Classic SoD Blood Moon PvP Event Guide
- Cheryl
- Share
- WoW Classic SoD
- 03/05/24
- 1337
Hail Adventurers! Are you ready to go where the bravest dare?! Dive into the heart-pounding chaos of the Blood Moon Event and come out as if it was a walk through Stranglethorn Vale? With this guide in your hands, you'll be farming like a pro in no time at all! By following our steps and loading up on some new gear or mounts that Season of Discovery Phase 2 added. So let's do this!
- What is the Blood Moon Event?
- Best PVP Group Composition
- How to farm Gold efficiently?
- Class-Specific Drops
- How to boost gold income?
- How to find Kha'damu quickly?
- How to win more encounters?
↖ What is the Blood Moon Event?
The ancient writers would say it's a pulse-pounding open-world PVP extravaganza taking place in the jungles of Stranglethorn Vale. And they'd be right too… This is your chance to gather up the best when it comes to PvP & PvE gear, not just that but also grab two new mounts — Reins of the Golden Sabercat ![]() and Whistle of the Mottled Blood Raptor
and Whistle of the Mottled Blood Raptor ![]() . All you need are enough blood moon coins to buy them and those will be earned by participating in this event.
. All you need are enough blood moon coins to buy them and those will be earned by participating in this event.
It happens every three hours lasting only thirty minutes long. While it doesn't take long for you guys to kill off anyone who gets in your way, The blood moon event will turn friend into foe making sure everyone that enters these jungle battlegrounds knows who their true enemies are.
Make sure you keep track of its timing with Season of Discovery addons like Nova World Buffs so you can beat everyone else there first. Just remember once again that during these thirty minutes people will betray each other left right and center — except for those trustworthy teammates of yours.
↖ Best PVP Group Composition
The Blood Moon is a fickle mistress who favors the bold. While you can buddy up with your comrades in arms, forming groups of up to five players, raid-sized parties will find themselves at a disadvantage. It's time to strategize and assemble your elite squad for glory.
Your success in the Blood Moon event hinges on your group's composition. While there's room for creativity, here's a tried-and-true formula:
- 1 Dedicated Healer: The backbone of your team's survival.
- 1 Ranged Damage Dealer: For picking off enemies from a safe distance.
- 1 Melee Damage Dealer: To bring the pain up close and personal.
The remaining two spots offer flexibility. Consider adding crowd control specialists or additional support to balance your team. Classic WoW's lack of diminishing returns on crowd control spells makes them incredibly potent. Share your winning compositions in the comments and let's learn from each other!
↖ How to farm Gold efficiently?
Now, for the secret sauce - how to farm SoD coins like there's no tomorrow. The key lies in understanding the Blood for the Blood Loa ![]() buff mechanic. Here's how it works:
buff mechanic. Here's how it works:
- Killing Spree: Each enemy player your team downs gives you five stacks of the buff.
- Stacking Up: Accumulate up to 255 stacks for maximum coinage.
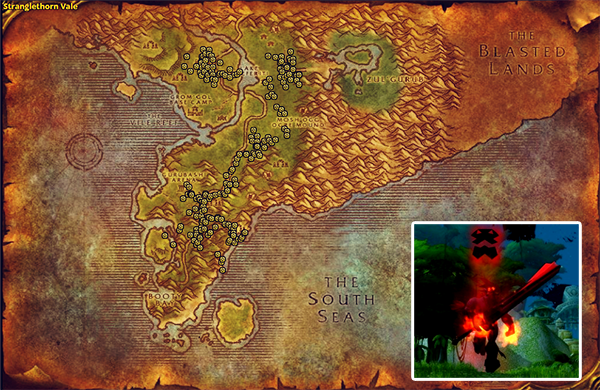
- Blood Altars: Exchange your blood stacks for coins at these sanctuaries marked by red flags on your map.
But beware! Falling in battle means losing a chunk of your hard-earned stacks. The more you carry, the more you stand to lose upon death. Once exchanged at an altar, however, those coins are yours forever.
For peak efficiency, stick close to the Blood Altar. Doing so guarantees quick turn-ins and reduces death penalties. Plus, it puts you on the forefront of action—the ideal opportunity for collecting up all those cherished Blood Coins.
↖ Class-Specific Drops
What would a PVP event be without some new gear to brag about? And the Blood Moon does not disappoint. For each specialization there is a range of powerful class-specific items available. Hunters in particular might find something they like with the unique twist prepared for them. However, no one will be able to wear more than one item at a time. How these treasures can be obtained remains a secret as of yet, but the chase will certainly make it feel worthwhile.
| Druid |
|
| Hunter |
|
| Mage |
|
| Paladin |
|
| Priest |
|
| Rogue |
|
| Shaman |
|
| Warlock |
|
| Warrior |
|
↖ How to boost gold income?
Let's get straight to it, how do you get more coins? To fatten up your Blood Moon wallet you need to align yourself with a certain NPC — Kha'damu. This elite boss can be found in Stranglethorn Vale and is invincible, they may try to destroy you on sight but fear not! Kha'damu isn't all bad as he also gives out powerful buffs that can enhance your coin farming efficiency.
So here's how it works: if you stand a little close then maybe you'll receive the Kill 'Em Bleed buff or if you're brave enough to hug him then maybe the Feast of Blood ![]() buff will come your way. These buffs are like keys to a treasure chest, blowing up the number of coins awarded per kill.
buff will come your way. These buffs are like keys to a treasure chest, blowing up the number of coins awarded per kill.
↖ How to find Kha'damu quickly?
Now for the big question: How can I spend less time finding Kha'damu? You might just have good luck but there are tactics to boost your chances. Kha'damu always appears near one of the blood altars and announces his presence with an ear-piercing scream.
To increase your odds when searching, follow these strategies:
- Start at the northernmost altars with three teammates, work through each altar as you head southward.
- For an even more coordinated effort, send three players off at different top map altars looking for Kha'damu. Once located, call everyone back immediately.
- If this elusive boss doesn't show his face right away, meet at the southernmost altar and comb through STV from south upwards between deaths.
Remember that ghost form is faster for scouting — use it to your advantage. Get your team to resurrect at the same spot so you don't get separated.
↖ How to win more encounters?
Coming out on top in encounters is all about tactics and unity. Staying together and linking back up after deaths is crucial for keeping control of a situation. Place markers on team members to keep track and call for regroups when necessary.
When re-engaging, don't dive right into large melees. Instead, let ranged teammates chip away as you focus on picking off targets from the outskirts. Aim for smaller skirmishes that are easier to manage and be sure to always target healers and fragile opponents first.
And there you have it — a full guide to dominating the Blood Moon event. With these strategies at your disposal, you'll be rolling in rewards that even long-time residents of Stranglethorn Vale would kill for. Happy hunting!
Most Popular Posts
- WoW Classic SoD Gold Farming: Top 7 Best Locations in Phase 2
- Season of Discovery Phase 2 Hunter BiS Guide: Best Gear Pick
- Season of Discovery Phase 2: In-Depth Class Tier List Analysis
- WoW Classic SoD Lost Rigger Cove Loot Guide
- WoW Classic SoD Phase 3: Definitive Class Tier List
- How Do I Make Gold Fast in Season of Discovery?
Popular Category Lists
- WoW Classic SoD / (41)
- WOW Classic / (1)